
So I spent yesterday morning entering the metadata to describe some 70 or so packages that are all part of a big data load that moves data off the mainframe (DB2) into SQL Azure. Occasionally, I would build the packages with BIML Express to ensure I hadn’t introduced bad metadata. Today, I tweaked the BIML to allow for column level mappings between source and target tables. Almost all of the tables are being staged into SQL Azure in the same format that they appear in DB2, so this was not necessary for those packages as BIML and SSIS will sort out the mappings automatically.
Before I get into the advanced material though, I need to finish the introduction that I started before the new job and move to Tennessee.
♦ ♦ ♦
In the last post, I wrote about the metadata we need so that we can create ETL Packages.
We’re going to need at least the following tables:
- Package
- Connection
- PackageConnection
- ConnectionType
Additionally, Packages can have a Parent Package.
A Data Model Diagram might look like this:

With these tables, we can:
- Define a Package to be Generated
- Store the connection strings we need for our Development connections
- Identify which source and target connections to use
- Identify the Type of a Connection so we generate the right Source and Target components
- Choose which packages to generate
- Identify Parent-Child package relationships
- Select whether a connection is at the Package or Project level
Defining a Package in MetaData
By populating the Package table, we can define a package to be generated.
| Package | ||
| PackageId | Int | Identity, Primary Key, Not Null |
| PackageName | Nvarchar(200) | Not Null |
| ConstraintMode | Nvarchar(10) | Not Null, Default: Parallel |
| ProtectionLevel | Nvarchar(50) | Not Null, Default: EncryptSensitiveWithUserKey |
| ParentPackageId | Int | Nullable, Foreign Key to Package.PackageId |
| GeneratePackage | Bit | Not Null, Default: 1 |
Inserting a row into the table can be as simple as:
INSERT INTO Biml.Package (PackageName) VALUES ('My First Package');
With the table populated, we can now look at the Biml Code to Generate a Package from the MetaData defined so far.
To get started:
- Make sure you have Visual Studio 2015 and the latest SSDT, and that BIML Express is installed.
- Create a new Integration Services project named “My First Biml Project”
- Delete the Package1.dtsx that is created for you
- Right-click on the Project and select Add New Biml File

- Right-click again to add a second Biml file and rename the file to be: “My First Biml”

Now we have two blank Biml files, we need to setup a connection to the Biml MetaData tables.
In the Main Biml Connection file, enter this code:
<Biml xmlns="http://schemas.varigence.com/biml.xsd">
    <Connections>
        <Connection Name="MainBimlConnection" ConnectionString="Data Source=MySqlServerInstance;Initial Catalog=BimlMetaDataDB;Provider=SQLNCLI11.1;Integrated Security=SSPI;" />
    </Connections>
</Biml>
That’s it. This file is done and won’t need to be changed unless you move your BimlMetaData database to a new server.
In the second file, we’ll be getting a bit more code in.
We’ll start by declaring our code language as C# and importing a couple of namespaces:
<#@ template language="C#" hostspecific="true" tier="0" #>
<#@ import namespace="System" #>
<#@ import namespace="System.Data" #>
Next, comes the Root Biml tag:
<Biml xmlns="http://schemas.varigence.com/biml.xsd">
Now, we need to use the connection we defined in the other file:
<# var bimlConfigConnection = (AstDbConnectionNode)RootNode.Connections["MainBimlConnection"]; #>
Then we’ll start the Packages tag:
<Packages>
Now, we pull in the records from the Package table to define our package(s) and close the Packages tag:
<# var  packagesToCreate = ExternalDataAccess.GetDataTable(bimlConfigConnection.ConnectionString,    "SELECT PackageId, PackageName, ConstraintMode, ProtectionLevel, GeneratePackage FROM Biml.Package p WHERE GeneratePackage = 1 ORDER BY p.PackageName");     foreach(DataRow package in packagesToCreate.Rows) {         #>
        <!-- Build Package Here -->
    <# } #>
</Packages>
Where we put the comment, we need to put the code that builds the package itself, such as:
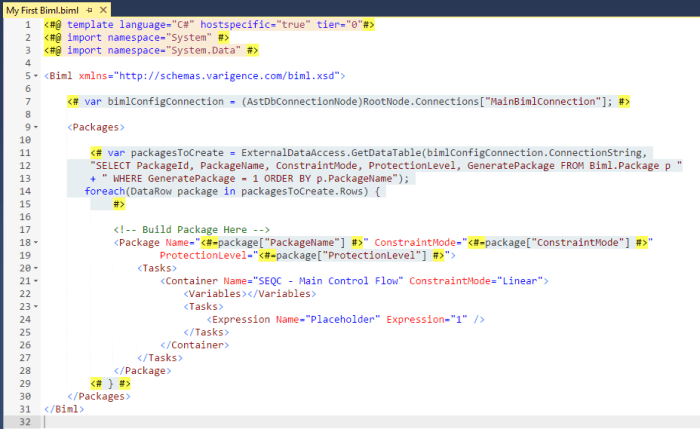
<Package Name="<#=package["PackageName"] #>" ConstraintMode="<#=package["ConstraintMode"] #>" ProtectionLevel="<#=package["ProtectionLevel"] #>">
    <Tasks>
        <Container Name="SEQC - Main Control Flow" ConstraintMode="Linear">
            <Variables></Variables>
            <Tasks>
                <Expression Name="Placeholder" Expression="1" />
             </Tasks>
         </Container>
    </Tasks>
</Package>
The final Biml file should look like this:
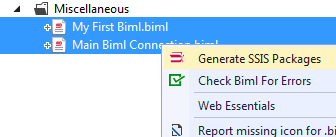
Now, to generate the package. First, select both Biml files (shift-click). Then right-click and choose “Check Biml For Errors”:

If there are any errors, read the error and check the Biml against the sample.
If there are no errors, then right-click again and choose “Generate SSIS Packages”:
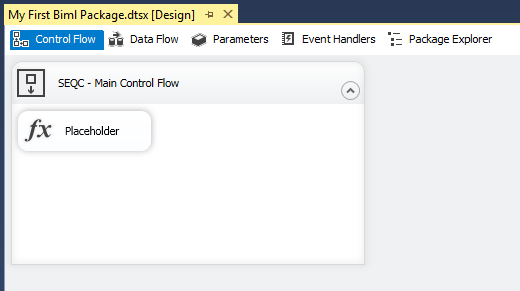
In a few seconds, the Biml engine should generate the package we defined:
That’s it for now. I’ll be back on as soon as I can to add connections to our package.

|
|
|

[…] Continued here: Introducing BIML – Continued […]